

Keycloak + Spring Boot + Spring Security
Running KeyCloak using docker

I am a volunteer QA engineer at openMRS and currently trying to adventure into technical writing, FHIR standard and backend development using Java, Spring Boot, JPA / Hibernate.
Keycloak is an open source Identity and Access Management solution targeted towards modern applications and services.
Features
They include;-
- Single-Sign-On (SSO)
- Identity Brokering and Social Login.
- User Federation.
- Client Adapters.
- An Admin Console.
- Account Management Console.
Admin Console: to configure the Keycloak server and create realms, roles, users and clients;
Single Sign-On (SSO): using the Open ID Connect (OIDC) authentication protocol on top of OAuth 2.0;
Client Adapters: These are libraries that makes it very easy to secure applications and services with Keycloak. We call them adapters rather than libraries as they provide a tight integration to the underlying platform and framework. This makes our adapters easy to use and they require less boilerplate code than what is typically required by a library.
Admin REST API: for user management.
To learn more about Keycloak, please visit the official page found at https://www.keycloak.org/. In this tutorial i am going to take you through how to run keycloak using https://www.docker.com/.
Make sure you have docker installed on your machine. To check if you have docker installed and find out its version, open your terminal and enter
docker version.
Run image from quay.io/keycloak/keycloak:19.0.1
Open your terminal and run docker run -p 8080:8080 -e KEYCLOAK_ADMIN=mherman22 -e KEYCLOAK_ADMIN_PASSWORD=admin123 quay.io/keycloak/keycloak:19.0.1 start-dev which exposes keycloak on the local port 8080 and initialise and admin user called mherman22 with a password admin123.
Admin Console
After all the downloads are done and keycloak starts in the container, open http://localhost:8080/admin and use the above mentioned credentials to login.
Keycloak comes with a default realm called master A realm can be defined as a set of users, credentials, roles, and groups being managed together. For example A user belongs to and logs into a realm. Realms are isolated from one another and can only manage and authenticate the users that they control.
However, it is not advised to use the the master realm. So we need to create our own realm that we will use to manage and authentication + authorize users.
Creating our own realm
- open http://localhost:8080/admin which is our keycloak admin console.
- Click the dropdrown in the top-left corner named
masterand then clickCreat realm. - Fill in the required fields i.e
Realm nameand click thecreatebutton. I have named my realmLogin
After creating our realm, we need to create users that will use that realm and also test out if the users can login into their various consoles.
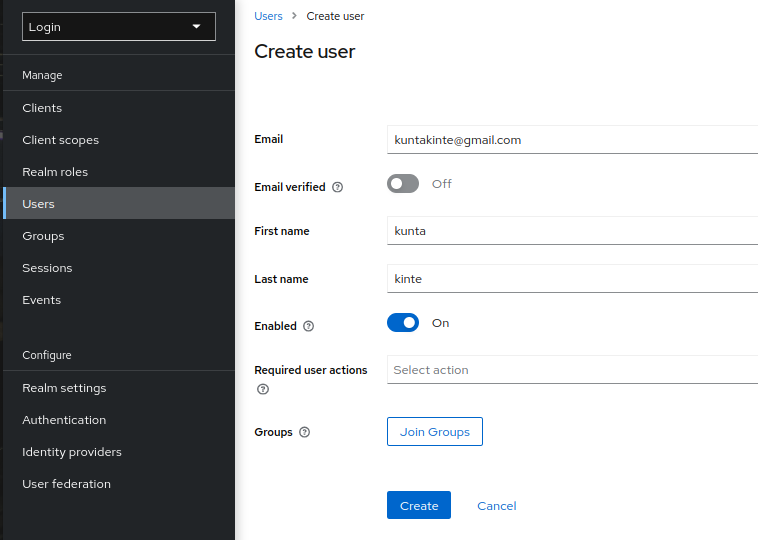
Creating a user
open http://localhost:8080/admin which is our keycloak admin console.
Click
Usersand clickAdd userbutton.Fill in the form with the following values:
Username: kuntakinte08
Email: kuntakinte@gmail.com
First Name: kunta
Last Name: kinte
- Click
Createbutton
As shown below
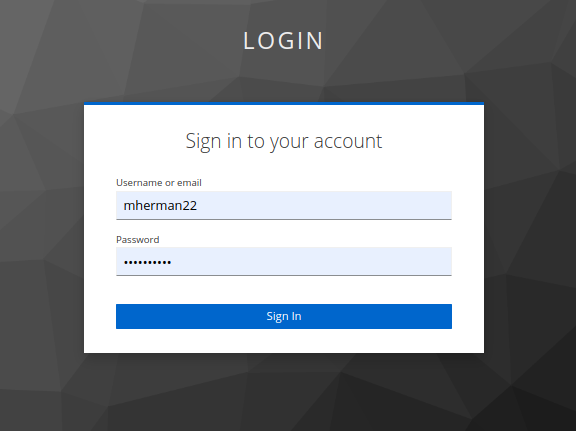
The user will need an initial password set to be able to login. And therefore we will need to Click Credentials and Fill in the Set Password form with a password.
Now we can logout of the current admin console session and go to http://localhost:8080/realms/login/account in order to verify if the user we created earlier on can login into the account. (as shown below is the login page for the user account)
I would like to end this here so that it doesn't get confusing. I will create another publication to show how to integrate spring boot, spring security with keycloak.


